Welcome to the installation tutorial of Flow 2 !
The setup is much easier than the previous version based on Lemur, just follow those few steps and everything will be up and running
The steps are the following:
- Create virtual midi ports
- Open Vienna Ensemble Pro Server and apply the settings, then load the flow project
- Copy the logical presets in the Cubase folder (restarting Cubase is required)
- Open the Flow Cubase project, import the generic remotes and apply the required settings
- Copy the data folder from the Flow+ template product to the data folder in the Flow+ source location
- Download latest version of open stage control, do initial setup and run
- Add email and license, activate the machine and start again the application
Video - Setup guide

1. Requirements
Your system should be upgraded to at least the following versions or higher:
- Open Stage Control v1.8.11
- Cubase Pro v11
- Vienna Ensemble Pro v7
- Kontakt v6.5.2
2. Create virtual MIDI ports
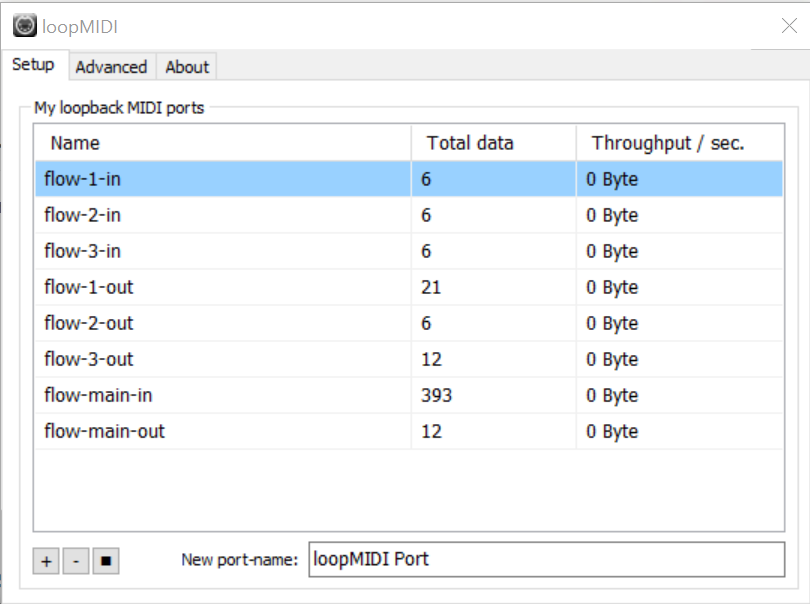
To work with Flow you need to create midi ports that are used to let your DAW communicate with the Flow application. To properly work you need to create 6 midi ports with the following names:
- flow-1-in
- flow-1-out
- flow-2-in
- flow-2-out
- flow-3-in
- flow-3-out
- flow-main-in
- flow-main-out
2.1. Windows users
LoopMidi is a simple free application that allows you to create midi ports.
You can download LoopMidi from this page
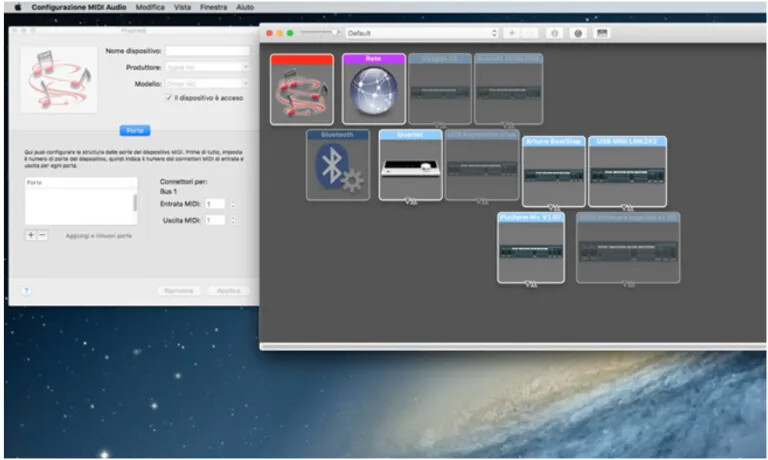
2.2. Mac users
Mac users can use the native MIDI solution to create the necessary midi ports.
To do this go in Window > Show MidiStudio Click ‘choose midi configuration’ and then ‘new configuration’ (or click on the red square image).
Finally add the new ports as listed in the previous page while keeping blank the name of the configuration and ensuring to click on the activate checkbox.
Please make sure to leave empty the name of the device which by default is IAC, if the ports do not have the same name the communication between Flow+ and Cubase will not work
3. Setup Vienna Ensemble Pro Server
Vienna Ensemble Pro is a cross-platform network solution that allows to decouple the sample management from your DAW with terrific improvement on the workflow and use of resources.
In FLOW Vienna can be used for one single machine, but the template can easily be split to be used in a network of computers.
The “disable” function allows to create a huge template that starts with nothing loaded in memory, thus you can enable only the tracks you need and optimize the use of your resources.
In FLOW all the automations are set so that you can later enable/disable channels easily from the tablet.
There is only one configuration to change in Vienna: go in Preferences and set the midi channels, audio input and output as shown in the picture below (you can set higher values but not lower):
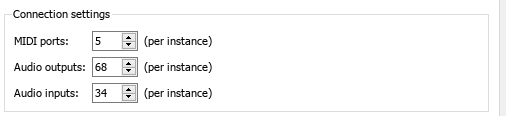
Another setting which I advice to change is to uncheck the “Enable parameter tweaking with mouse wheel” to avoid the annoying change of parameters while scrolling with the mouse over the instances
![]()
For further information on these options you can visit:
https://www.vsl.co.at/en/Vienna_Ensemble_PRO/Product_Info.
After these settings are changed you need to restart Vienna and finally load the FLOW project, you will see it will load in a few seconds and without any error. You are now ready to proceed to the next step.
Important: if you use multiple machines please make sure to make this change in all the instances currently installed (included the DAW Master).
When loading instruments in Vienna for the first time you might be asked to locate the folder, this typically happens for libraries which are not registered in Native Access
4. Setup Cubase Pro
Cubase is one of the most popular digital audio workstations of our time. Flow2 uses the version Pro of Cubase because of its capability to handle the switching of articulations through expression maps, this can happen internally in Cubase (through the midi editor) or remotely via an external MIDI controller.
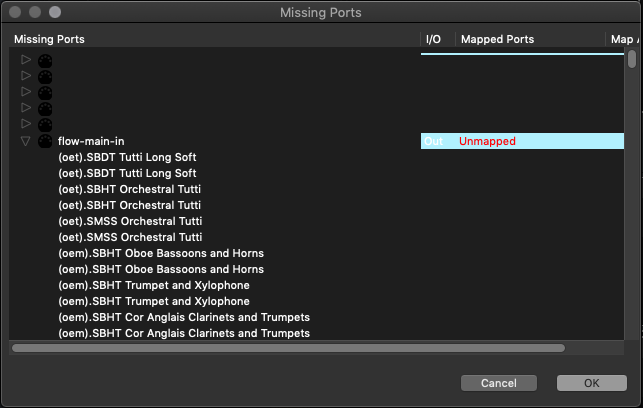
When you launch Cubase for the first time you might see a windows like this that says that one of the flows port are not mapped. Before closing this window make sure to click on the Unmapped red text and select the right port from the list. If the port is not in the list then it means you have not well configured the midi ports and you should come back to chapter 2
4.1. Project logical presets
The first step to configure Cubase is to import the logical presets which are used by Flow application to control Cubase.
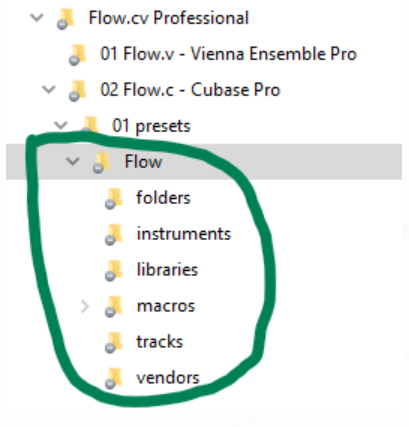
To do that you need to import the content of the folder Setup/Project Logical Editor into your Cubase folder Presets/Project Logical Editor (copying whole Flow2 folder).
Mac location:
User/Library/Preferences/Cubase/Presets/Project Logical Editor
Win location:
C:/Users/[your user]/AppData/Roaming/Steinberg/Cubase/Presets/Project Logical Editor
Copy the entire Flow folder with all its content into the Cubase Project Logical Editor folder.
4.2. Generic remotes
To setup Cubase you need to create one generic remote for each generic remote file located in the generic remote folder.
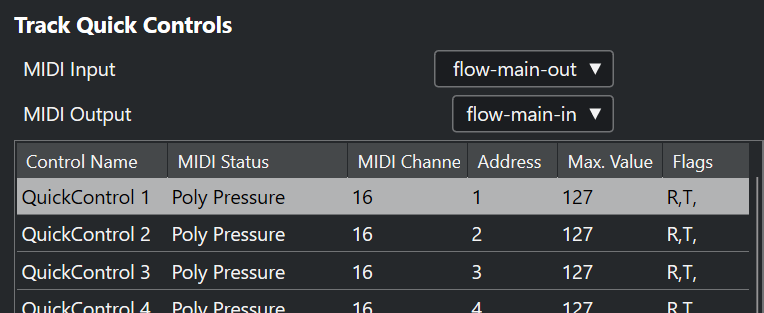
A generic remote can be added from Cubase in the menu Studio → Studio Setup → + Add device → Generic Remote, after creation import the generic remotes that are part of the Flow2 files you have downloaded. You also need to import the quick controls one in the standard “Track quick control” generic remote of Cubase.
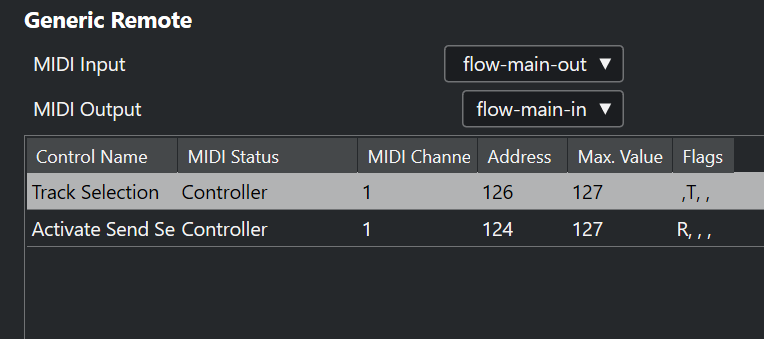
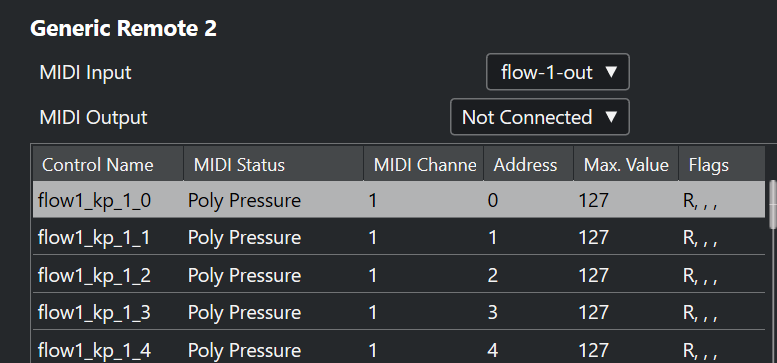
After importing a generic remote set the midi input and output as specified in the name of the file (the in port in the out field)
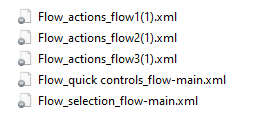
Flow_selection_flow-main.xml
Flow_actions_flow1(1).xml
Flow_actions_flow2(1).xml
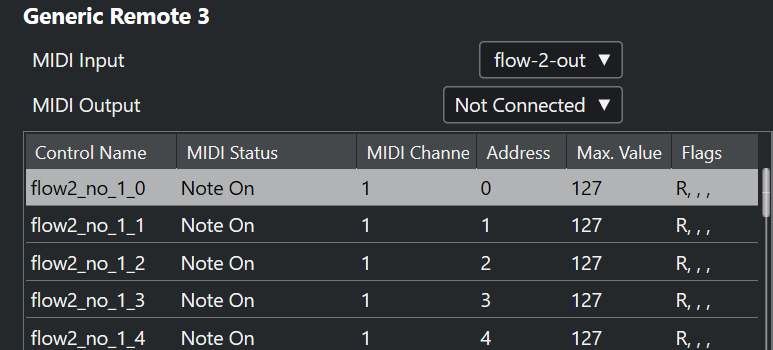
Flow_actions_flow3(1).xml
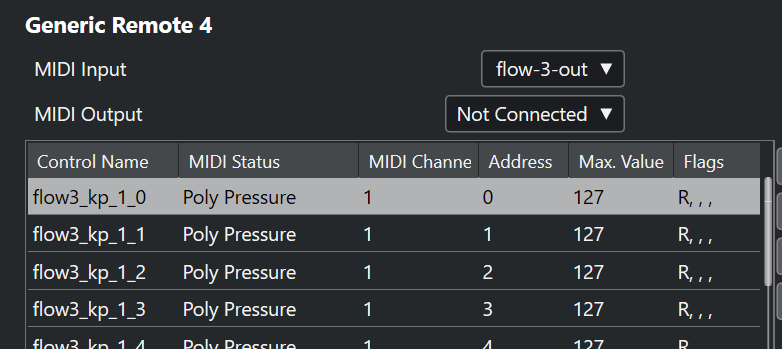
Flow_quick controls_flow-main.xml
4.3. Setup expression map remote mode
You need to change the way Cubase receives trigger to change articulations from a remote. The default setup is with a MIDI CC, you will need to switch to program change since this is the way Lemur communicate with Cubase to ask for an articulation switch.
Cubase will later transform this Program Change message into a MIDI CC and sent it through to Vienna which will then apply the change.
To change this parameter open the Flow2 Cubase project, select any instrument track, go to expression map, click setup Expression Maps (bottom of the long list) and in the dialog window set to Program change the parameter as shown in the picture on the left.

A restart of Cubase is required to make the copied presets available in the Project logical editor window
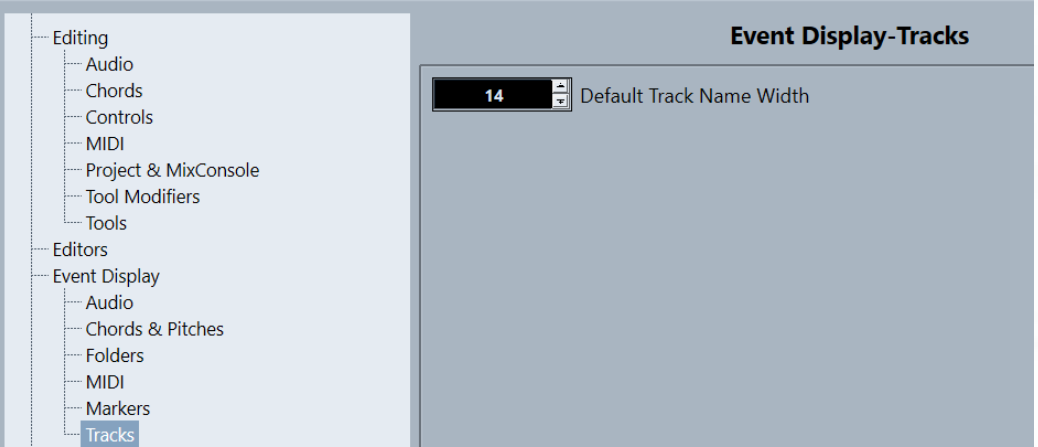
4.4. Project preferences settings
Open the Preferences settings located in the Edit menu and make sure the option “Enable Record on Selected Midi Track” is checked otherwise Cubase will not be able to send info on the selected track to Flow+

Also make sure to increase the width of the track names to the max value (currently 14 for Cubase 11)
5. Setup Open Stage Control
Since version 2.0 Flow interface is built with Open Stage Control application.
More information on the product can be found here: https://openstagecontrol.ammd.net
When you launch Open Stage Control server for the first time you might get an alert from your Antivirus for which you might need to configure an exception. After that the server might not restart for a few minutes. Just restart the PC or wait a couple of minutes to launch it again
5.1. Import data from Flow template
Flow+ needs json data to visualize its content, when you purchase Flow+ it comes with no data. The data is purchased separately within template products and needs to be imported in the app folder.
To do so copy
- the content of the folder 01 data (located inside the folder 03 Flow+ of the template project) (just the content not the entire folder)
- inside the folder data of the Flow+ application folder as shown in the picture

5.2. Installation
Starting from version 1.7 of Open Stage Control the installation is pretty simple, all required libraries are bundled in the downloaded package so all you need to do is download the latest version from this page and run it.
5.3. Configuration
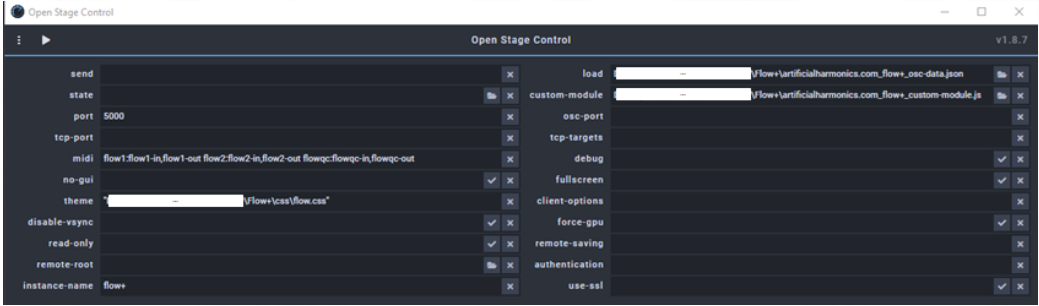
When launching for the first time you need to do the following settings:
- port: 5000 (or the one you prefer)
- midi: copy and paste this value flow:flow-main-in,flow-main-out flow1:flow-1-in,flow-1-out flow2:flow-2-in,flow-2-out flow3:flow-3-in,flow-3-out
- theme: select the flow.css file located in the css folder of Flow+ source
- instance-name: flow+ or as you like
- load: select the artificialharmonics.com_flow+_osc-data.json file located inside flow+ sources folder
- custom-module: select the artificialharmonics.com_flow+_custom-module.js file located inside flow+ sources folder
5.4. Important for Mac users, launch the server with root rights
Fixed with the new version 1.0.1! Download the new version and just run the server normally
5.5. Authenticate the machine
With the order you have received a license key which allows you to use the application in one server at the time (but all the clients you need).
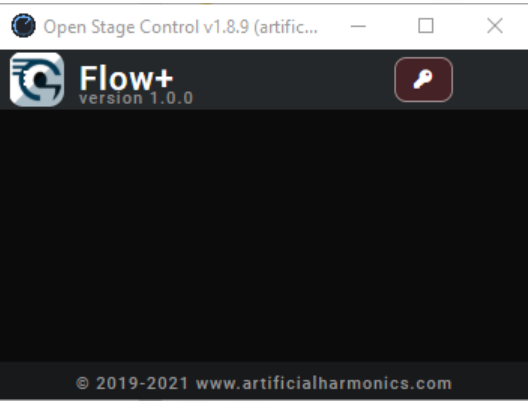
At the first launch you will need to validate the license and authorize the machine. You can do so clicking on the key button located in the top menu.
Insert the email address used to purchase Flow+ and the license you have received with your order, then click activate (or reset if you want to use Flow+ on a different machine)
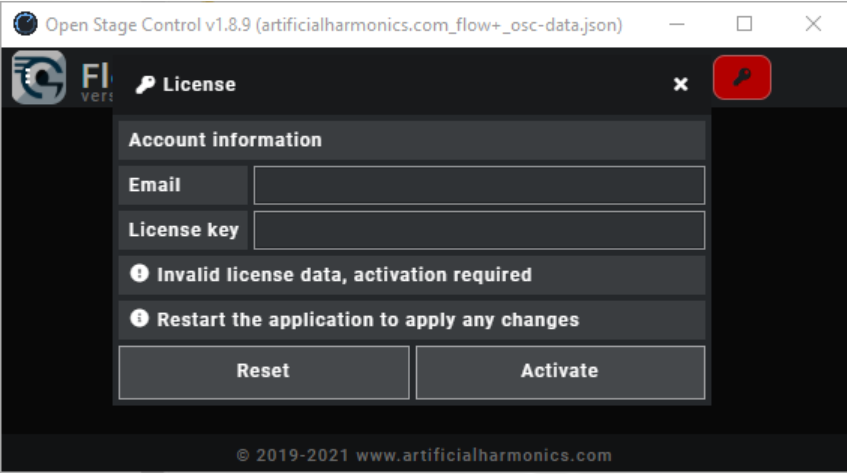
Please note that Flow+ requires an internet connection to check the license, if this is not possible for more than 10 days the password will be reset and a new activation will need to be performed.
It is necessary to restart the application after the activation is fully validated
6. All done
Congratulations, if you arrived here it means everything is set and ready to work ![]()
Now is time to start composing!